Configure Your Splunk Instance
These directions are specific for MISA 532 students.
Splunk is meant to aggregate real-time data for investigation, monitoring, and analyzing incidents. For educational purposes, students will use course provided stagnant datasets to leverage Splunk tools and functionality. In order to fully configure your instance of Splunk, you'll need to complete the following:
Part I: Install Apps & Add-ons
The Splunkbase library allows users to select an app or add-on to customize the functionality of Splunk. The dataset for MISA 532 requres the following applications, which are distributed and licensed separately and should be installed before using the dataset. The versions listed are those that were used to create the dataset. Different versions of the software may or may not work properly, so it's important to install the apps listed below exactly as they appear in the Splunkbase library.
Follow the directions below to install the necessary apps and add-ons. You will need to repeat the steps to install each app/add-on.
Step 1
If not already loaded, open Splunk in your preferred browser (Chrome is recommended). Type http://127.0.01:8000 in the address bar. You'll need to login using the administrative credentials you made during Getting Started.
Note: After the 60-day or 15-day trial ends, your account becomes free. This means an administrative login is not required to access your instance of Splunk.

Step 2
Select the icon to open the Manage Apps window.

Step 3
Select Browse more apps. There will be apps/add-ons already listed from installing Splunk; you're encouraged to browse these apps as well to learn more about them.

Step 4
Copy the name of the app/add-on exactly as it shows in the table to the right and paste it on the search box.
Hit enter and select on Install beside the appropriate app/add-on.

Step 5
Upon selecting Install, Splunk will prompt you to provide your Splunk credentials created when registering in Splunk’s site on the Getting Started page.
Enter your credentials, accept the terms and conditions, and select Login and Install to proceed.
Note: Splunk may ask you if you want to restart now or later. Select Restart Later. You'll restart after installing all apps/add-ons.

Step 6
Repeat Steps 3-5 for all required apps and add-ons in the table, with the exception of SA-cim_validator. You'll install this in the next step using a downloaded zip file.
Step 7
Download the SA-Cim_validator-master.zip file. Navigate to Splunk and select the icon to open the Manage Apps window.

Select Install app from file.

Step 8
Select Choose File to search for the SA-Cim_validator-master.zip. Then, select Upload to upload the zipped file.

Step 9
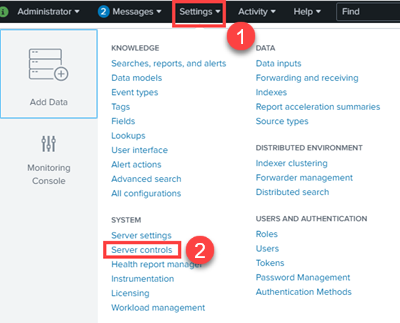
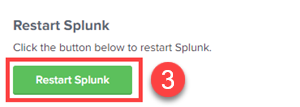
Once you've installed all the apps, you'll need to restart Splunk. To restart Splunk:
- Open Settings from the Splunk navigation.
- Select Server controls.
- Select Restart Splunk.
It may take time for Splunk to restart - do not close the browser until Splunk has refreshed with the login page.
Step 10
Move onto Part II: Download & Install Dataset to complete Splunk configuration.
Part II: Download & Install Dataset
Description of dataset
Step 1
Download the dataset file indicated below. You'll use the MD5 hash to check the integrity in step 5.
| Dataset | Description | Size | Format | MD5 Hash |
|---|---|---|---|---|
| botsv3_data_set.tgz | Boss of the SOC (BOTS) v3 dataset | 320.1-607MB | Pre-indexed Splunk | d7ccca99a01cff070dff3c139cdc10eb |
Step 2
On your machine, navigate to C:\Program Files\Splunk\etc\apps.
Note: You may be prompted to enter administrative credentials before your system will allow you to open the Splunk folder.

Step 3
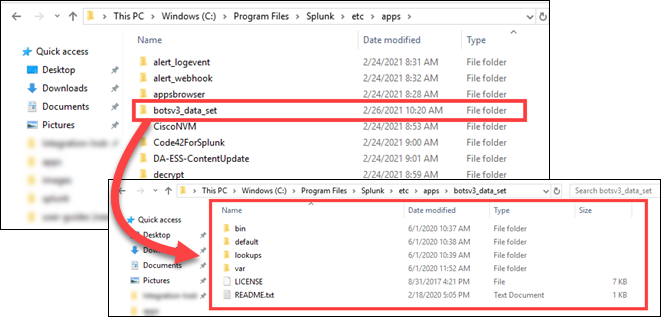
Unzip the botsv3_data_set.tgz file into the C:\Program Files\Splunk\etc\apps folder.
Important Note: Be sure the data is extracted into a new folder titled botsv3_data_set within the apps folder. If you are using built-in Windows extracting capabilities, it may extract the .tgz file to a .tar file type. In this case, you'll have to extract the file twice to get the content properly setup. Use the images below to guide you.
Step 4
You'll need to verify that the MD5 hash is the same as the one listed in the table in step 1. This is to ensure the data file is not compromised.
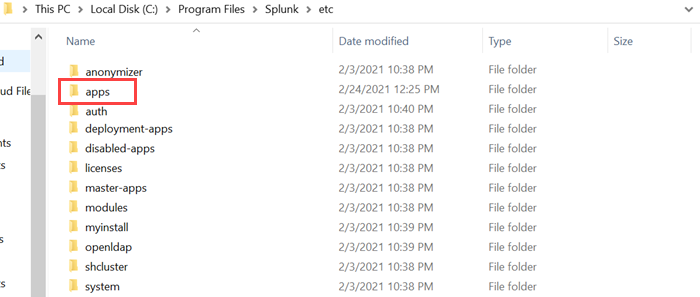
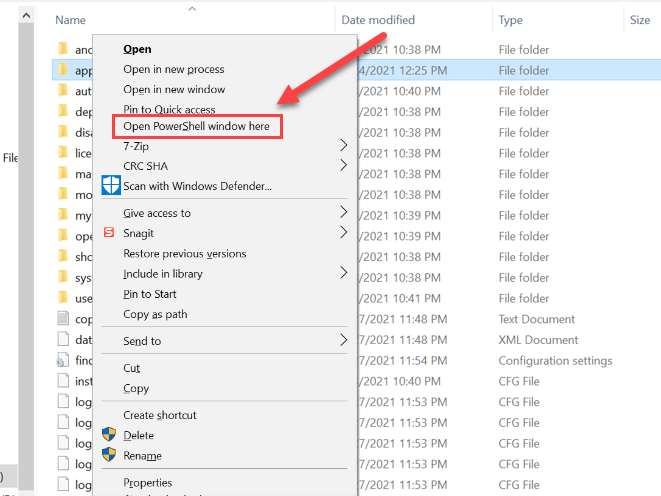
In the C:\Program Files\Splunk\etc folder, locate and hover over the apps folder. Hold down the SHIFT button on your keyboard and right click at the same time to pull up options for the folder.
Note: The directions for checking MD5 hash are for Windows machines. If you are using a Mac or a Linux, visit the vendor's website for support.
Step 5
From the options, select Open PowerShell window here.
Step 6
In PowerShell, type get-filehash -Algorithm MD5 .\botsv3_data_set.tgz and hit enter. Additionally, if you type the letter 'b' (for bots) and hit tab twice, it should auto complete.
Note: If you make a typo/syntax error, this step will not work. Be sure to type it exactly as it appears above.
It should look like the image below. If your Hash value is different than d7ccca99a01cff070dff3c139cdc10eb, it means you are using a different version that may or may not be legit/corrupted. Delete the file and try again; contact your instructor if the problem persists.

Step 7
Now that the files are in the Splunk folder structure, you'll need to restart Splunk. To do so:
- Open Settings from the Splunk navigation.
- Select Server controls.
- Select Restart Splunk.
It may take time for Splunk to restart - do not close the browser until Splunk has refreshed with the login page.


Step 8
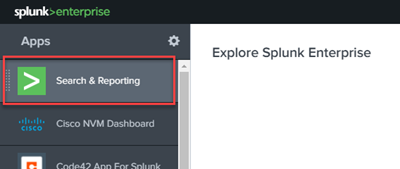
Open Splunk and navigate to Search & Reporting.
Step 9
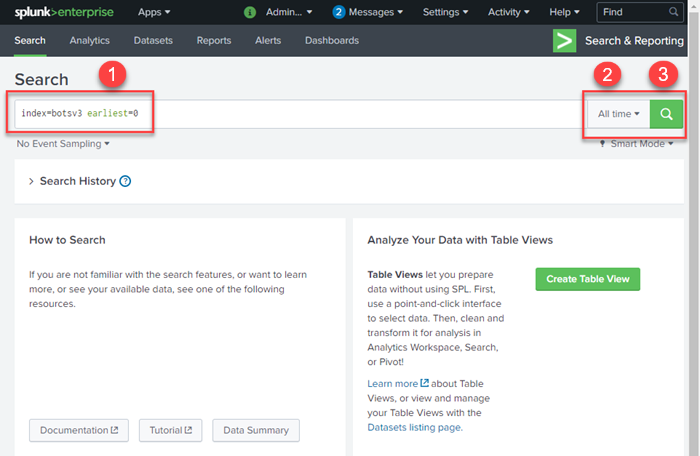
- Type the following in the search textbox: index=botsv3 earliest=0
- Select the time frame you wish to search (last 24 hours, last thirty days, all time, etc.)
- Select to begin searching for events.
Note: If you cannot produce any events from the data set, this is typically because the data is not located in the right structure within the apps folder. Once you've confirmed that the folders are in the correct structure (see steps 2 & 3), reach out to your instructor for guidance.
Step 10
Your Splunk instance is configured! You can now complete course work, including accessing Splunk Fundamentals I resources. Visit the Additional Resources page to learn more about Fundamentals I, dashboards, and other Splunk resource documentation.