Getting Started with Splunk
When registering, you will see two options for the Splunk free trial: Splunk Enterprise (desktop) and Splunk Cloud (browser). However, Splunk Enterprise for a desktop is the only version applicable for ERAU courses; Splunk Cloud has limited capabilities and will not be sufficient to complete ERAU course work. Splunk Enterprise is an executable, so users must have administrative rights on their device to install Splunk Enterprise.
If you do not have administrative rights on your device, reach out to your instructor ASAP. You may be unable to complete course work without administrative access.
Students will have full access to Splunk Enterprise for 60 days after installation. Once the free trial is up, your Splunk account will automatically convert to a free Splunk account. You'll have access to the features needed for ERAU courses, but some additional features will be removed.
How to Download & Install Splunk Enterprise (desktop version)
Use the steps below to sign up for Splunk and to download the desktop free trial.
Step 2
Before you can download Splunk Enterprise, you'll be prompted to register. Complete the registration process. It will ask for the version you want to try, but there is an additional page before you can begin downloading the product.
Note: If you already have a Splunk account, it is preferable to register again using your @my.erau.edu address as it is affiliated with ERAU. Additionally, this ensures that your other account does not interfere with course work.

Step 3
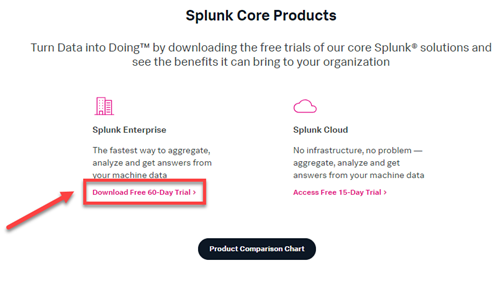
Make sure you are logged into the Splunk website once you've registered. You'll be taken to the Free Trial and Downloads page. Select Download Free 60-Day Trial under Splunk Enterprise.
Note: If you're not automatically taken to the downloads page after registration, select the Free Splunk option again.

Step 4
Choose your operating system and select Download Now. The downloading process can take a while, so be patient and make sure your computer doesn't go to sleep!
Note: Linux users must reach out to Splunk directly for help setting up your instance and importing data. Visit the Support page for support information.

Step 5
Once the file has downloaded, run the .msi file. This will open the Splunk Enterprise Installer. Check the box to accept the License Agreement and select Next.
You'll be prompted to provide administrative permissions to continue the installation process. Enter your computer login information and continue.
Note: If you do not have administrative rights on your device, reach out to your instructor ASAP. You may be unable to complete course work without administrative access.

Step 6
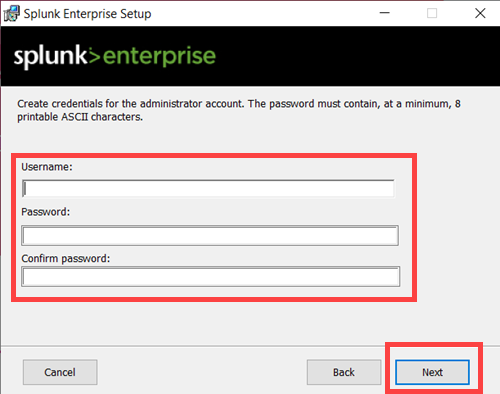
The system will prompt you to generate an administrator account for Splunk Enterprise; this account is separate from the Splunk account you created. The administrator account is only accessible during the free trial; after the 60 days, you will no longer be asked to login with this account because your overall Splunk account will be given free, but limited access.
You may want to use the same username and password as your Splunk account, to prevent confusion. Fill out the information and select Next.

Step 7
You can choose to create an optional Start Menu shortcut. Select Install.
Note: You may be prompted to enter your admin credentials again to start installation.

Step 8
It may take time for the program to install - be patient and make sure the computer doesn't go to sleep! Select Next when available.

Step 9
Leave the Launch browser with Splunk Enterprise checked and select Finish. Splunk Enterprise will load in your preferred browser.

Step 10
Continue to Configure Your Instance to finish setup.
Note: After Splunk Enterprise is installed:
- Splunk’s home directory will be C:\Program Files\Splunk on a Windows device or in the Apps folder on a Mac.
- Splunk Web will be available using a web browser (Chrome recommended) at https://127.0.0.1:8000/. You can log in using your created admin credentials.
