Manage Your ePortfolio
Before you begin managing your portfolio, it's important to understand the components of the tool.
- A section in your ePortfolio is similar to a folder. Creating a section allows you to organize multiple pages. Sections can be labeled by course, topic, or learning outcome.
- A page allows you to organize submissions and reflections in a meaningful way. They exist within a section and can have multiple content blocks and reflections on them. Pages are used for specific assignments or topics that align with the section's purpose.
- A content block includes images, videos, descriptions, and course submission artifacts. A page can have multiple content blocks and reflections.
- An artifact is a type of content block that includes an assignment or discussion course submission you can attach to a page. Artifacts help you identify course work you've done that you can then reflect upon.
- A reflection is a comment you can make on different pages within the ePortfolio. This allows you to draw meaningful connections between multiple artifacts and align them to the overall purpose of the section.
Select an option from the left menu to learn more.
Adding a Section to Your ePortfolio
Be sure you are in the right ePortfolio you want to manage. If you have more than one ePortfolio, you'll be presented with the links to all of them. For additional guidance on how to access ePortfolios, visit the Getting Started page of this guide.
Step 1
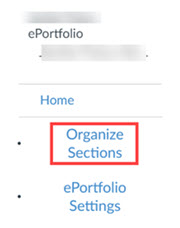
Select Organize Sections.
Step 2
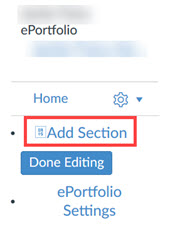
Select Add Section.
Step 3
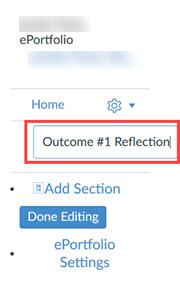
Enter the name of your section. Refer to your course for any specific naming conventions.
Step 4
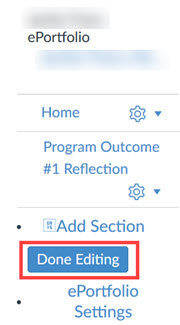
Once you're finished adding all your sections, select Done Editing.
Organizing Sections in Your ePortfolio
Be sure you are in the right ePortfolio you want to manage. If you have more than one ePortfolio, you'll be presented with the links to all of them. For additional guidance on how to access ePortfolios, visit the Getting Started page of this guide.
You can change the order of your ePortfolio sections by completeing the following steps.
Step 1
Select Organize Sections.

Step 2
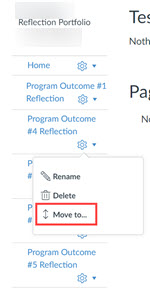
Select the icon beside the section you want to move.
Step 3
Select Move to. A dialog box will open.
Step 4
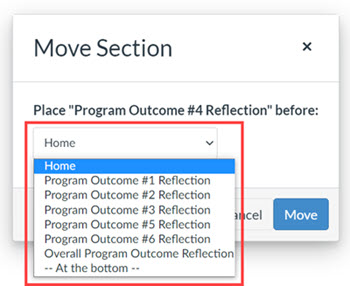
From the dropdown, select which section you want to place the current section before.
Step 5
Select Move.

Step 6
Once you've organized the position of your sections, select Done Editing.

Deleting a Section in Your ePortfolio
Be sure you are in the right ePortfolio you want to manage. If you have more than one ePortfolio, you'll be presented with the links to all of them. For additional guidance on how to access ePortfolios, visit the Getting Started page of this guide.
Step 1
Select Organize Sections.

Step 2
Select the icon beside the section you want to delete.
Step 3
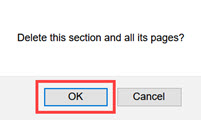
Select Delete. A dialog box will open.

Step 4
Select OK.
Note: Deleting a section will delete any pages within it. You cannot move pages between sections, so be careful when creating pages!
Step 5
Once you've delete all the sections you want to remove, select Done Editing.

Adding a Page to a Section
Be sure you are in the right ePortfolio you want to manage. If you have more than one ePortfolio, you'll be presented with the links to all of them. For additional guidance on how to access ePortfolios, visit the Getting Started page of this guide.
You can't begin to add pages until you've established your sections. You can't move pages between sections, so it is critical that you have sections organized first.
Step 1
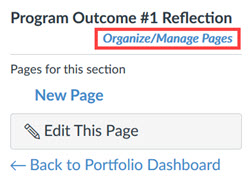
Open the section where you want to add a page. Select Organize/Manage Pages.
Step 2
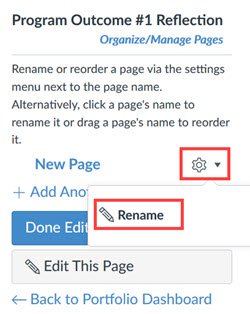
Every section automatically comes with a page loaded in it.
If this is the first page you are creating, select the icon next to New Page. Then select Rename. Enter a new name for the page; follow any naming conventions specific to your course.
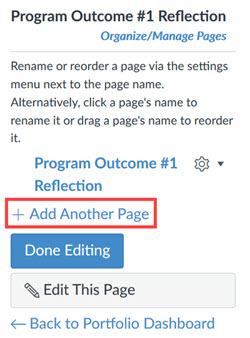
If you're adding an additional page, select Add Another Page. Enter the name for the page; follow any naming conventions specific to your course.
Step 3
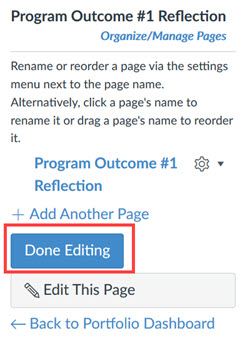
Once you've added all the pages you want, select Done Editing.
Organizing Pages in a Section
Be sure you are in the right ePortfolio you want to manage. If you have more than one ePortfolio, you'll be presented with the links to all of them. For additional guidance on how to access ePortfolios, visit the Getting Started page of this guide.
Step 1
Open the section where you want to organize pages. Select Organize/Manage Pages.

Step 2
Select the icon beside the page you want to move.
Step 3
Select Move to. A dialog box will open.
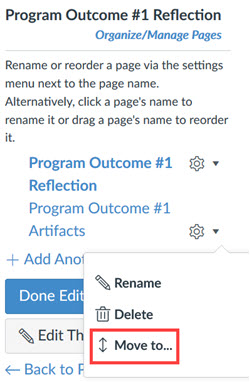
Step 4
From the dropdown, select which page you want to place the current page before.
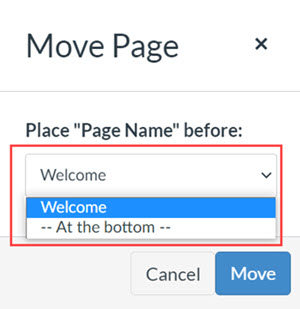
Step 5
Select Move.
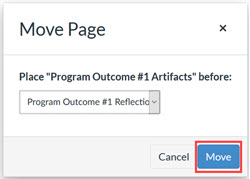
Step 6
Once you've organized the position of your pages, select Done Editing.

Adding a Content Block to a Page
Be sure you are in the right ePortfolio and page you want to manage. If you add a content block to the wrong page, you'll have to delete it and start over. Please visit the Pages area of this guide prior to reading about content blocks.
You can customize all pages within your section to include content blocks for descriptions, images, course submission artifacts, and reflections. This area of the guide is to help you add content blocks to a page.
Step 1
Open the page you want to edit by selecting it from the section menu. The page you are currently viewing is bold in the section menu.
Select Edit This Page.
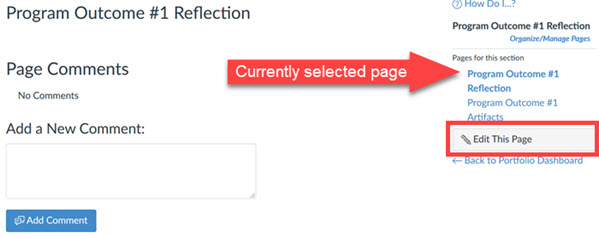
Step 2
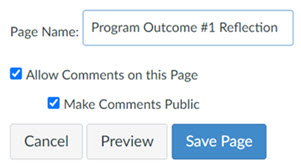
From here, you can change the page name, allow comments, and make comments public.
Step 3
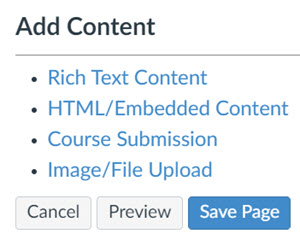
You can also add content blocks to the page. Select the content block type you want to add from the Add Content options.
Note: Visit the Content Block Types area of this page to learn more about each type.
Step 4
You can add as many content blocks as you wish! This is especially helpful when adding multiple course submission artifacts. Below are a few organizing tips to consider before saving your page:
- To move content blocks, hover over the symbol until your cursor changes to the following symbol will. Then you can click and drag items in the order you want.
- To delete a content box, select the icon.
- Select Preview to see what your page will look like.
Step 5
Select Save Page when you're finished.

Example of Page in a Section
Select the image below to open it larger in a new tab.
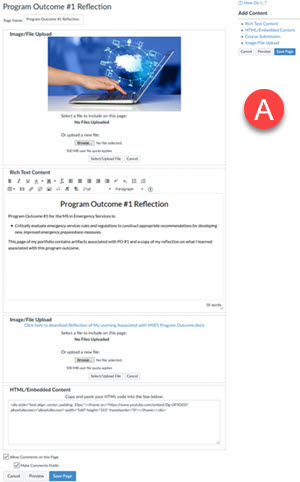
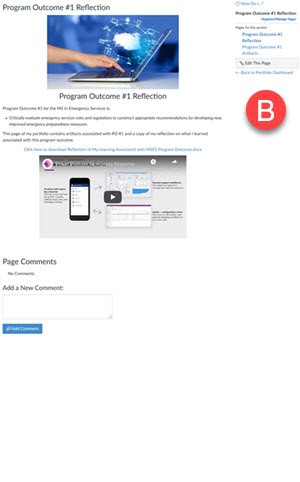
- Example of page and content blocks during editing.
- Example of course submission content block once saved.
Example of a Course Submission Content Block
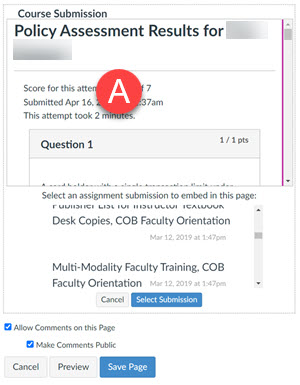
- Example of course submission content block during editing.
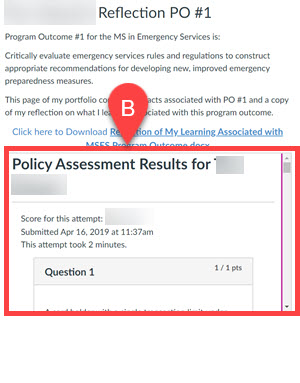
- Example of course submission content block once saved.
Deleting Pages in a Section
Be sure you are in the right ePortfolio you want to manage. If you have more than one ePortfolio, you'll be presented with the links to all of them. For additional guidance on how to access ePortfolios, visit the Getting Started page of this guide.
Step 1
Open the section where you want to delete pages. Select Organize/Manage Pages.

Step 2
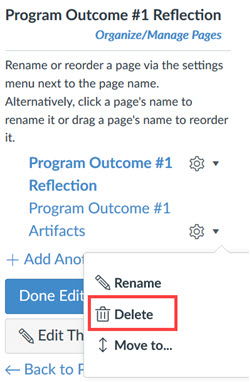
Select the icon beside the page you want to delete.
Step 3
Select Delete. A dialog box will open.
Step 4
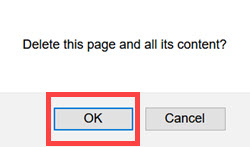
Select OK.
Step 5
Once you've deleted pages, select Done Editing.

Content Block Types
There are four types of content blocks in Canvas ePortfolio. Use the table below to familiarize yourself with the types. You can add any content block to your page and a single page can have multiple content blocks.
| Block Type | Description | Example |
|---|---|---|
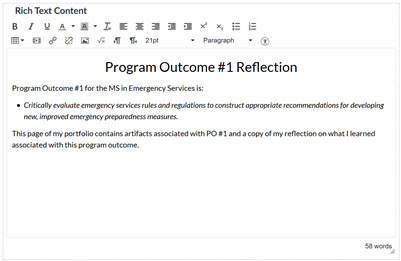
| Rich Text Content | This adds a textbox that allows you to create tables, add links, equations, and
other general content. This is a great area to describe the page, including any
information about the assignment or learning outcome you're showcasing. You can
also embed a Canvas Studio video in this area. Note: Occasionally, the toolbar will not appear for this content block. You may need to type in the box and save the page, then return to edit to get it to appear. You can also try adding more blocks and moving the Rich Text Content box around. If you need additional support, visit the Support page of this guide. |
 |
| HTML/Embedded Content | This adds an area that you can paste HTML embed coding into. This is a great
place for using an iframe code to embed YouTube videos, websites, live
documents, or other HTML assets. Note: This area is not for general information. Only use the HTML/Embedded Content block if you are comfortable with HTML coding. |

|
| Image/File Upload | Use this to upload a file or image pertaining to this particular page. This could include images for aesthetic purposes or new documents you want to include on your page. |  |
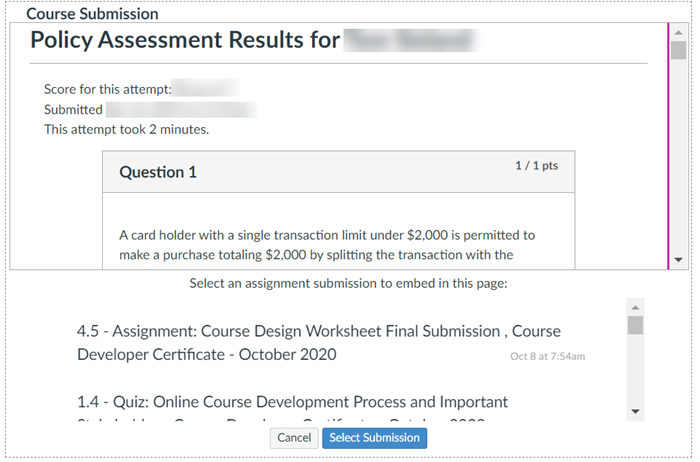
| Course Submission | Use this to add artifacts from previous course submissions to the page. This can
include assignments, discussions, quizzes, or exams taken in
Canvas. Course submissions are not grouped by course; all submissions are displayed in an unorganized list. To quickly find what you need, hold Ctrl + F (for Windows users) or Command + F (for Mac users). A search box will appear in your browser; enter the name of the submission you want to add and select it within the Course Submissions box. Note: This content block only pulls submissions from Canvas. Submissions to third-party vendors cannot be added to a page this way. |
 |
Organizing Content Blocks on a Page
Be sure you are in the right ePortfolio and page you want to manage. If you add an content blockto the wrong page, you'll have to delete it and start over. Please visit the Pages area of this guide prior to reading about content blocks.
Step 1
Open the page you want to edit by selecting it from the section menu. The page you are currently viewing is bold in the section menu.
Select Edit This Page.

Step 2
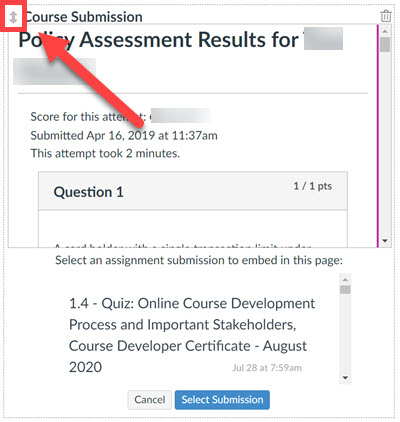
Next to the content block you want to move, hover over the symbol until your cursor changes to the following symbol. Then you can click and drag items in the order you want.
Step 3
Once you've gotten all your course submission content blocks where you want, select Save Page.

Deleting Content Blocks on a Page
Be sure you are in the right ePortfolio and page you want to manage. Please visit the Pages area of this guide prior to reading about content blocks.
Step 1
Open the page you want to edit by selecting it from the section menu. The page you are currently viewing is bold in the section menu.
Select Edit This Page.

Step 2
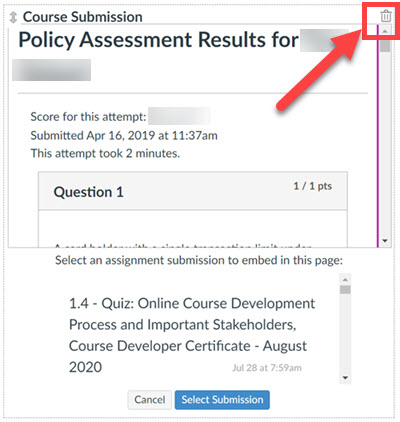
Next to the content block you want to delete, select the icon.
Step 3
Once you've removed content blocks, select Save Page.

How do I reflect on a page?
Reflecting on an entire page can be done in a few ways:
- You can use the Image/File Upload content block to upload a file with your reflection. Depending on your needs, this could be a Word document, PowerPoint presentation, or video file.
- You can write a comment on a page that includes your reflective thoughts. However, a page comment does not have formatting tools. You must have the page set to Allow Comments to do this.
- Your instructor can also comment on artifacts this way; you must set the comments to Public if you want the comments to be available to anyone viewing the ePortfolio.
How do I reflect on an artifact?
If you want to reflect on a single artifact, consider placing the artifact on its own page along with your reflection. You can also place multiple artifacts on a single page, and include a reflection that ties all artifacts together. You can reflect on the artifacts in a few ways:
- You can use the Image/File Upload content block to upload a file with your reflection. Depending on your needs, this could be a Word document, PowerPoint presentation, or video file. Be sure the course submission artifact is also located on the page.
- You can write a comment on a page that includes your reflective thoughts. However, a page comment does not have formatting tools. You must have the page set to Allow Comments to do this.
- Your instructor can also comment on artifacts this way; you must set the comments to Public if you want the comments to be available to anyone viewing the ePortfolio.
How do I share my ePortfolio with my instructor or course?
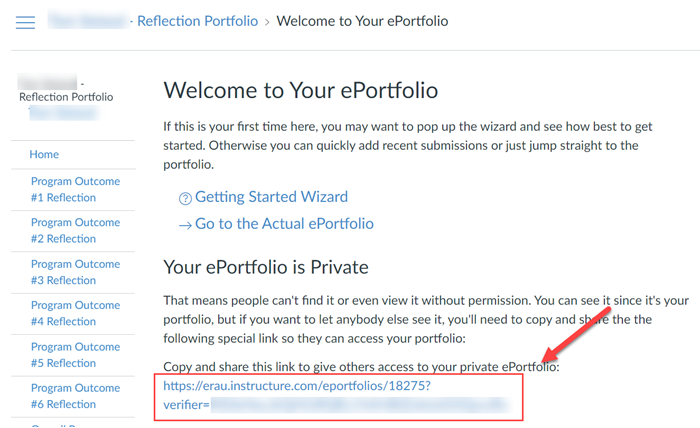
The URL you share when your ePortfolio is set to private is only accessible by ERAU users logged into Canvas. By default, your ePortfolio settings are set to private.
When you open your ePortfolio, you'll be brought automatically to the information page. From there, copy the shareable URL. Once you give it to anyone with ERAU login credentials, they can view your ePortfolio.
How do I share my ePortfolio with my non-ERAU affiliates?
There are two ways to share your ePortfolio with non-ERAU users:
- Share the URL: Your ePortfolio settings must be set to public for the URL to be accessible by non-ERAU users.
- Download a ZIP file: Doing this will download all resources in your ePortfolio to a readable ZIP file.
How to Share Your ePortfolio with a URL (Public)
If your ePortfolio is not already set to public, follow the steps below to adjust the settings.
Step 1
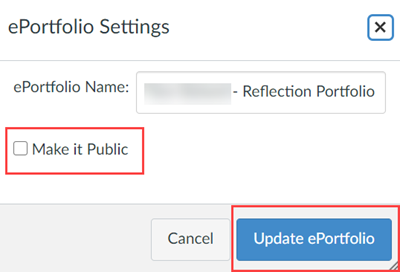
From the ePortfolio section menu, select ePortfolio settings. A dialog box will open.

Step 2
Select Make it Public. Then select Update ePortfolio.
Step 3
Copy the URL in the address bar; now that the ePortfolio is public, anyone with the URL can view it regardless of their ERAU affiliation.

How to Download a ZIP File
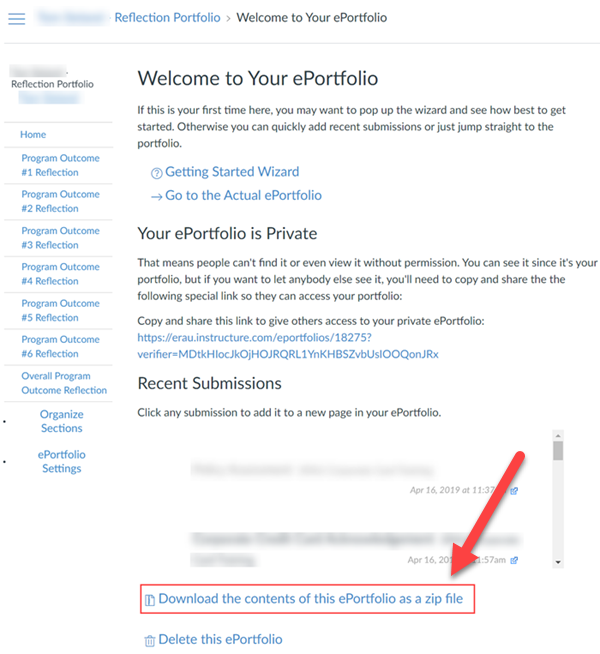
When you open your ePortfolio, you'll be brought automatically to the information page. From there, select Download the contents of this ePortfolio as a zip file. Once you select the link, your download will automatically begin. It'll display a progress bar while it downloads all ePortfolio resources.
